Marketing automation is one of the most frequently mentioned concepts at the networking events I attend. I’ve noticed that while my clients are very much on board, there are still so many questions about how it works and what it involves. Some people think it sounds too complicated and never get started, while others have already taken their first steps. I’m happy to provide you with a few useful tools in this article to help you get started with marketing automation. I explain how to set up a marketing automation campaign in five easy steps.
Step 1: Develop your campaign plan
The first step is identifying your target audience. Who do you want to focus on? If you don’t yet have a clear image of your target audience, start by reading our article on personas. This article assumes that you already know who your personas are.
You start by choosing the persona you will focus your campaign on. Then you look at the needs of that persona. What are the goals, challenges and constraints of this persona? What trigger can you use with him/her? What products could this persona be interested in and why?
To give you an example:
David
Meet the persona David. He wants to expand his delivery area but is unsure of how to do it and which products he can use for that purpose. He is young and likes to capitalize on the latest trends.
Suppose you are a company that sells fries. You can offer David a whitepaper with various tips on how to best cook and package his fries, as well as which combinations with other products are suitable for delivery. Additionally, you can also offer him a sample package that allows him to try a product specially developed for delivery.
Find the right ‘call to action’ for your persona. In the example mentioned above, downloading the white paper and the option to request a trial package are your calls to action.
Step 2: Build your campaign flow
The next step is to build a flow. This is something you want to do in order to map out what it will take to set up your campaign.
Emails:
You start working towards your ‘call to action’ email by email. In our example, that would include downloading the whitepaper or requesting the trial package. Example: In the first email, you guide the customer(s) to a landing page where they can find high overall information. In email two, you give more information on a specific call to action, which could be requesting a trial package. Finally, you can arrange a follow-up sales call after the third email. This brings you through the entire customer journey.
Add more rules:
If you are already a little more advanced with marketing automation, you will probably want to add a few more rules here too. If someone has already requested a white paper directly after email 1 on the landing page, you can insert a rule that email 2 -which refers to the white paper- will be skipped for this person. This ensures that everyone only gets information relevant for them.
Forms:
Practically every flow also uses forms to obtain additional customer data. I will explain more about this later on in this article.
Building a flow:
Once you have thought everything out, you then start building your flow. This is nothing more than establishing a succession of emails.
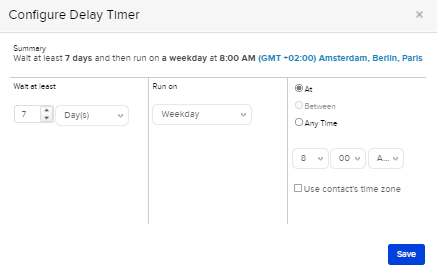
This is also where you determine the length of time between the first email and the following email. In general, this will be between 5 to 7 days. Here, you can also define whether you only want to send emails on working days, or if emails should be sent in the morning or the afternoon.
Step 3: Specify each element of your campaign flow
The third step is to specifically create all the individual elements. This means writing the emails, developing the call(s) to action (CTA) and creating the forms.
Emails:
Write all the emails addressed to your persona, truly responding to their goals, challenges and constraints as they apply to your specific campaign. In my previous example, the challenge was ‘dealing with deliveries’. Be sure to mention this ‘pain’ in your email. The title of the email could be: “Deliveries made 10x easier with…”. If your persona can identify with this challenge, then they will definitely open the email.
Tips
Think carefully about the title and preview title you use. If you do not capitalise on a pain or a gain, the number of customers opening the email will be significantly lower than if you do. Never make your emails too long. Not all of the information needs to be in the email itself. They can find out more by clicking your CTA button. Focus primarily on triggering your persona to read more and to eventually click the button. After all, you want them to read as much information as possible on your website, where they can click through more and maybe even place an order. This is much more valuable than reading all the information in your email and then stopping

Lead magnets:
Once you have chosen a white paper you’ll need to properly format it. Again, make sure you adequately address your persona’s goals, challenges and constraints. Only mention relevant information to them and leave out everything else. People don’t like to read anymore so be ‘to the point’ with the information you offer. If you know that your persona is more responsive to visuals, capitalise on that by using more imagery in your white paper.
If you are using a trial package, make sure you clearly depict why someone should request this trial package. What could this product mean for them? How much easier will their lives be because of this product? Also, always remember to clearly name the action criteria.
Forms:
Forms are useful tools for getting more customer data, but also for enriching customer data with new or more up-to-date information. It’s important to remember that you can’t just simply ask for data from your customers. You need to look at the value of your call to action in order to determine what kind of customer data you can ask for. People will be willing to provide more data for a sample package than for a newsletter or a white paper.
See below for an example of form and the customer data that is requested:
Step 4: Tags and UTM tracking
Tags are often used to find out what actions a particular customer has triggered. UTM tracking links are also used to find out, for example, which button was clicked on. These tools should be implemented in advance and will help with your campaign analytics later.
Both are briefly explained below:
Tags:
Tags are a commonly used tool. They help you capture certain actions for each customer. For instance, you can add a tag to a button that allows you to see who clicked that button exactly. You can also go a step further by adding tags that relate to a specific action. This could include interest in lead generation using a tag such as: #interested_in_lead_generation.
Tags allow you to learn more and more about your persona and where their interests lie.
Working with tags means you can keep taking steps forward in the future and start thinking in segments. You can then choose actions such as creating a separate newsletter for a certain target group that responds to a need specific to that target group only.
UTM links:
A UTM (Urchin Tracking Module) is a URL that includes some additional coding. That sounds more complicated than it actually is. There are websites that can be used to easily create UTMs. This is one of the more commonly used websites to create them.
With UTM links, you can track where traffic is coming from (in your own Google Analytics account). You can put a UTM link behind every button in your marketing automation system. You can do the same in a social media ad. And if you place a banner on a 3rd party media website with a reference to a link on your website, be sure to put a UTM link behind that, too.
When you then look at your Google Analytics information, you will see where the traffic came from for each campaign. Knowing which channel appeals the most to this persona can be extremely useful since it was where the highest usage or conversion rates came from.
Step 5: Test your campaign and go live
You are now almost ready to click the live button and provide your customers with a great series of automated emails.
It is highly recommended to first carefully test every part of the flow you have created. This will help you avoid any mistakes that can be rectified in advance. A lot of marketing automation systems have simple options for this purpose.
Once you’re completely satisfied, you can go live with your campaign.
Want to get started on your own?
If you thought this article was interesting and are keen to look at the options for your own business, that’s no problem at all. We can help you set up campaigns as well as choose the right marketing automation system to suit your business.


